
Featured Project Return to Projects List
Texas Roadhouse - Refrigeration
Project Information
- Project Location:
- Howell, NJ
- Approx Contract:
- $30,000
- Status:
- Completed - Feb 2018
- Structure Type:
- Restaurant
References
- Client:
-
Mark
Lucherini
-
Chain Accounts
(216) 429-8690Trimark
Scope Of Work
Howell Work Scope:
Walk-Ins- Kolpak - custom
1.Receive and unload walk-in panels, (7) condensers, (8) evaporators, pre-charged refrigerant lines.**Price with item # 3 as separate line item** ** ** Include price to get roof top chillers ( beer system) on roof and mount on PVC ( not supplied) similar to other curbs. Install beer display window along with assemble and set in place shelving for the beer cooler ans install shadow panels we provide
2.Coordinate with Flooring Contractor and GC to ensure S/S thresholds are installed flush with finish floor.
3.Erect panels, hang coils, Place condensers on roof. **Price with item #1 as separate line item**
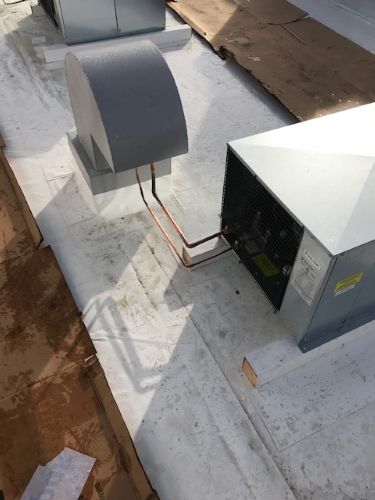
4.Un-box and secure all roof top condenser to proper locations
5.Provide PVC style fence posts, PVC end caps and pressure treated 4”x4”inserts to support condensing units on roof. Include for ice machines – 2 per condensing unit.
•Local codes requiring hurricane racks or other support / attachment supersede PVC detail, if required. **Price with #5 as a separate Line item**
6.Secure refrigeration lines on roof with 6”x4” section of PVC – see picture. Add vibration pads underneath
ALL PVC supports #4, vibration pads & labeling
7.Label all roof top condensers, i.e. “Beer Cooler”, “Freezer”, etc. Black permanent Marker (1” lettering)
8.Provide and run copper drain lines from evap. Install copper drain unions on evaporator drain pipe outlet.Set “P” traps just before penetration to outside panel- to kitchen drain – Penetrate exterior panels 8”A.F.F (4” above cove base).
9.Coordinate with Beer System Installer to avoid drain lines interfering with beer system equipment or shelving. Note: See attached drawing/diagram for Beer Cooler – drain line height. Over flow needs to go into overflow bottle. Do not tap into condensate lines.
10.Insulate freezer and beer cooler drain line only with heat tape. USE straps in lieu of STAND off brackets for drain lines unless local code specifies stand offs.
Straps for drains #10
11.Wrap Pre-Charge Line Fittings and suction lines with insulation.
12.Seal/foam all penetrations made in cooler
13.Mount Time Clocks above doors
•Wiring by GC- Coordinate with Site Electrician – It is the Refrigeration Contractors responsibility to verify Proper landing of wiring from supply to time clocks and time clocks to evaporator.
Time Clock placement
14.Install temp sensor devices as far from door as possible, for most accurate reading. Stretch lead completely and install level with outlet (see photos).
Thermometer located away from door to the side, not above. #14
15.Electrical, plumbing & roof penetrations to building – Refrigeration Contractor to coordinate with GC
16.Dumpsters by GC
17.Pull appropriate required permits
18.Start up and adjust (see start up procedures for freezer)
Ice Machines- two possible models
Manitowoc 2ea IY-2176-Ice Makers –OR- 2ea Hoshizaki KMS-2000MLH
1.Mount and secure condenser on roof, provide PVC style fence posts, PVC end caps and pressure treated4”x4” inserts per condensing unit, run lines through ceiling.
2.Add refrigerant to supplied line sets –
a.NOTE: Hoshizaki HS-0244 does not require refrigerant to be added – R-404A refrigerant included incondensing unit, needs to be charged.
3.Start up and adjust ice machine following Manufacturers guidelines
4.Water/electrical hookup – by others
5.Install IY 2176/KMS-2000MLH -Ice Makers
6.Install K00383 Ice Deflector per Manitowoc Installation Instructions (SEE ATTACHED INSTALLATION SHEET) –
a.Note: Hoshizaki units do not require deflectors.
Site Verification
•Send Dated Correspondence of each visit and Photos of progression of work.
•Thermal Break Prior to Screed Installation
•Screed installation, fasteners and Sealant of Screed Prior to Wall Panel Installation
•Wall Panels, Door Frame and Plugs and Installed Square and Plumb
•Sealant of all penetrations and cam plugs installed
•All Evaporators, Line Sets and Drain Line Lines with required insulation and accessories
•All Wired Time Clocks
•All Installed Condenser Units
Walk-in Temperature Settings – Fahrenheit
•Meat Cooler: 35 degrees
•Productions Cooler: 37 degrees
•Beer Cooler: 32 degrees
•Freezer: (- 10 degrees)
Start Up Procedures for Freezer
1.Day one – Drop freezer to approximately 40 degrees Fahrenheit
2.Day two or at least 24 hours later – Drop temperature another two degrees to approximately 10 degrees to30 degrees.
3.Day three or at least 24 hours later – Drop Temperature another 10 degrees to approximately 20 degrees.
4.Day four – Drop the Freezer to the desired temperature.
Defrost Cycles:
Freezers:8 AM and 8 PM, 2 AM and 2 PM (45mins) temp 0 to -5Digital stat: -5 with 5 def.Coolers Air Defrost:6 AM and 6 PM, 12 AM and 12 PM (30 mins) Then we add 15 min cycle between those times. This helps with the high volume in and outs. Produce cooler and meat cutting room. Temp 35 to 39 F. Digital stat: 35 with 4 def.
Coolers with Electric Defrost:
6 AM and 6 PM, 12 AM and 12 PM (30 mins).
Temp: 28 F to 33 FDigital
Project Images

